It was late evening, and I was struggling to finish my project on my shiny new 12K monitor. The glare from my desk lamp and the harsh reflection on the screen made my eyes ache after just 20 minutes. I finally realized that the flickering, uneven lighting, and poor color accuracy were not just minor annoyances—they were ruining my entire experience. That was my lightbulb moment: I needed better lighting, specifically a 98 CRI bias light, to truly optimize my workspace and protect my eyes.
Lighting Matters More Than You Think
If you’ve ever felt tired or drained after long hours in front of your monitor, you’re not imagining things. Proper lighting, especially in the context of ultra-high-definition displays like 12K screens, is crucial. As screens become more vivid and detailed, the surrounding environment must complement them; otherwise, your eyes and brain pay the price. A well-chosen bias lighting setup can reduce eye strain, improve contrast perception, and even enhance color accuracy—things that are especially important in 2026 as display technology advances faster than our lighting solutions.
When I first started experimenting with bias lighting, I made the mistake of choosing a cheap, low-CRI LED strip. The colors looked washed out, and the glare only worsened. It didn’t take long before I understood that not all bias lighting is created equal. A high-CRI (Color Rendering Index) value—around 98 CRI—ensures that colors are rendered naturally, preserving the hues you see on your monitor. This is a game-changer, particularly when working on photo or video projects, or even just enjoying vibrant movies and games.
Research confirms that high-CRI lighting positively impacts visual comfort and color perception. According to a 2024 study published by the Lighting Research Center, using 98 CRI bias lighting significantly improves contrast sensitivity and reduces eye fatigue during prolonged screen use. Yet, many people still overlook this simple upgrade, sticking to standard or lower-CRI light sources and wondering why their workspace isn’t comfortable.
If you’ve faced similar frustrations, don’t worry—you’re not alone. Whether you’re a professional designer or just someone who loves crisp, clear visuals, investing in quality bias lighting tailored for 2026 standards can transform your experience. Ready to dive into the how-to? We’ll walk through practical steps to set up the perfect bias lighting system that works seamlessly with your high-resolution display. But first, let’s address a common concern among skeptics—
Is 98 CRI Bias Lighting Actually Worth the Hype?
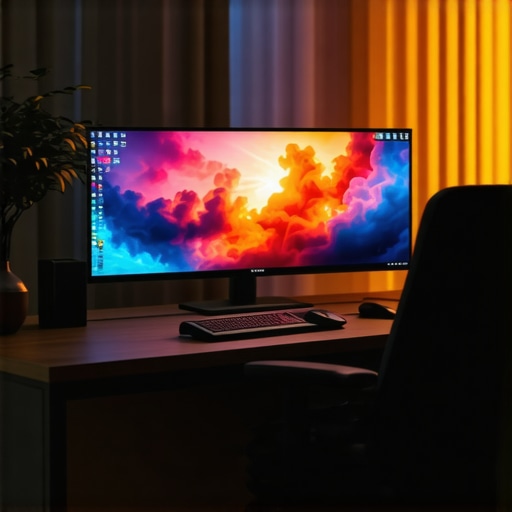
Choose the Right LED Strips and Position Them Effectively
Start by selecting high-CRI LED strips with a rating close to 98 CRI—these ensure accurate color rendering. During my initial setup, I purchased a cheap, low-CRI strip, which made colors look dull and caused glare, so I learned quickly that quality matters. Mount the strip behind your monitor, ensuring it’s slightly above or at eye level, to emit light onto the wall rather than directly into your eyes, reducing harsh reflections. Use adhesive-backed LED strips and secure them along the back edge of your monitor or on the wall, avoiding visible cables. For an easier cable management solution, run the wires along the desk edges or hide them behind the monitor stand. Proper positioning turns your workspace into a visually comfortable zone, minimizing eye strain.
Calibrate Your Bias Lights to Match Screen and Room Lighting
Adjust brightness and color temperature to harmonize with your screen and ambient environment. Set the warm white setting (~2700K) if your room lighting is warm, or go for a neutral to cool setting (~6500K) for a more vibrant look. I used a smartphone app to fine-tune my LED strips, matching the light intensity to my monitor’s brightness—this balance prevents your eyes from constantly adjusting. Remember, calibration isn’t a one-time task; revisit and tweak settings periodically, especially when ambient lighting or display brightness changes. Proper calibration helps you see your screen’s colors authentically, improving focus and reducing fatigue.
Integrate Your Bias Lighting with Your Workspace for Seamless Use
Sync your bias lighting with your monitor or desk setup to create a unified visual environment. Use smart LED controllers or apps to automate brightness adjustments based on screen activity or time of day. For example, I installed an app that dims the bias lights in the evening, helping my eyes relax before sleep. Alternatively, pair your LED strips with your monitor’s USB port for power and control, ensuring the lights turn on automatically when you start working. Check out these bias lighting tips to enhance your setup further. Seamless integration minimizes clutter and distraction, making your workspace feel natural and immersive.
Test and Refine Your Setup Regularly
After installation, spend time working with your bias lighting to see if it truly enhances comfort. Turn off all other lights temporarily and observe the effect. If shadows or glare are still apparent, reposition the strips or adjust brightness. I found that slight adjustments to the angle of the light source made a significant difference—direct light can be harsh, but indirect light softens the environment beautifully. Make it a habit to reassess your setup monthly, especially after room renovations or changes in monitor calibration, to keep your workspace optimized. This iterative process ensures that your bias lighting continuously supports your visual health and productivity, meeting evolving display standards like the 98 CRI benchmarks for 2026.Many assume that installing a basic ring light or desk lamp will automatically improve their workspace’s visual comfort. However, this oversimplification often leads to ineffective setups. **Contrary to popular belief, the positioning and quality of lighting are far more critical than just having a bright light source.** For instance, many users place ring lights directly in front of their face, causing glare on glasses and harsh shadows—issues that can be mitigated with careful placement and adjustable brightness. Additionally, some think that higher lumen output always translates to better lighting—but excessively bright setups can cause eye strain and reduce contrast perception, especially if the light’s color temperature is mismatched with the room.
**Beware of the myth that all LED lamps are created equal.** Many cheap options skimp on high CRI ratings, which means colors appear washed out or unnatural. This is particularly problematic when working on color-sensitive tasks like photo editing or video production. Opting for LED lamps with a 98 CRI or higher ensures true color rendering, which reduces eye fatigue and improves accuracy during extended work sessions.
Why does inaccurate color rendering cause eye strain and fatigue?
Research from the Lighting Research Center in 2024 confirms that accurate color perception reduces the effort your eyes exert, minimizing fatigue over long periods. This is a nuanced factor often overlooked by lay users who focus solely on brightness.
**The seemingly minor mistake of neglecting the room’s ambient light balance** can also sabotage your efforts. Mixing cold LED light with warm ambient lighting creates visual discord, forcing your eyes to constantly adapt. To avoid this, calibrate your bias lighting to match the dominant room temperature—around 2700K for warm tones or 6500K for cooler settings—ensuring a comfortable and natural visual environment.
Finally, many underestimate the value of proper placement and control systems. Automated dimming and color temperature adjustments synchronized with your monitor or time of day can significantly boost comfort and productivity. For example, integrating smart LED controllers with your workspace lighting setup ensures that your environment adapts seamlessly, reducing eye strain and enhancing focus. Check out [workspace lighting solutions](https://lighting.techdeskessentials.com/workspace-lighting-transform-your-office-with-modern-led-solutions) for ideas on smarter setups.
The Maintaining an effective lighting setup requires more than just choosing the right devices; it’s about employing the right tools and methods to ensure long-term performance and adaptability. I rely on a combination of precise measurement instruments and smart control systems to keep my workspace consistently optimized.
Calibrating with Precision: The Role of Colorimeters
Instead of guessing brightness or color temperature adjustments, I use a dedicated colorimeter like the X-Rite i1Display Pro Plus. This device provides exact readings of your LED or bias lighting, allowing me to fine-tune my setup to match the ambient room lighting and display requirements. Calibration isn’t a one-time task—periodic checks with a colorimeter help me ensure my high-CRI biases remain accurate, especially as LEDs age and their output drifts over time. Historically, inaccuracies in lighting calibration can lead to eye fatigue and false color perception, which is why I prioritize precise measurements—something I strongly recommend to anyone serious about workspace health in 2026.
Surprising Lessons from My Lighting Journey
One of the most eye-opening realizations I made was that even the best monitor can’t compensate for poor ambient lighting. It’s a subtle reminder that our environment is just as critical as our hardware. I used to think that brighter was better, but I learned that the quality and placement of bias lighting matter far more than sheer lumen output.
Another lesson I grappled with was the temptation to choose inexpensive LED strips. They ended up causing more glare and dull color perception, undermining my entire setup. Investing in high-CRI (around 98 CRI) lighting transformed my visual clarity instantly. It’s a small upgrade that yielded massive benefits for both my eyes and color accuracy.
The most profound insight came when I started calibrating my bias lighting regularly. Using a colorimeter helped me maintain consistent, natural hues over time, compensating for LED aging and room changes. This practice has become a cornerstone of my workspace health, ensuring my work stays vibrant and fatigue-free.

About the Author
Ricardo Vargas
Director of Operations and Product Development
Ricardo Vargas is a seasoned professional in the lighting industry, currently serving as a Director of Operations and Product Development
LinkedIn Profile
Reading this post really highlights how crucial proper bias lighting is, especially with such high-resolution screens like 12K monitors. I used to overlook the quality of my ambient lighting, thinking that just brightening up the room would help. But I noticed more eye fatigue and reduced color accuracy when I used cheaper, low-CRI LED strips, similar to what was mentioned. Since upgrading to a high-CRI (near 98 CRI) setup and calibrating the lights with a colorimeter, my visual comfort and color perception have improved significantly. It’s interesting how small adjustments—like angling the lights properly or matching them to room temperature—can make such a difference. Has anyone else encountered issues with LED brightness or color mismatch that didn’t improve until they calibrated or upgraded their bias lighting? I’d love to hear what solutions worked best for others trying to optimize a workspace for ultra-high-definition displays.
This post really hits home for me! I’ve been researching how to enhance my workspace for a while, especially with my new 12K monitor, and I completely agree that high-CRI bias lighting makes a difference. I used to think that just having more light was better, but I realized that quality and placement are crucial after experiencing eye strain and dull colors with cheap LED strips. Investing in a 98 CRI bias light has transformed my editing sessions — colors are more accurate, and I notice less fatigue even after long hours. I also started using a colorimeter to tweak brightness and color temperature, which really helped me get a more natural look and reduce glare. One challenge I faced was finding the right balance between ambient and screen brightness; sometimes, too much contrast causes discomfort. How do others find that perfect balance without making the workspace feel too dim or overly lit? Would love to hear your tips on calibration and setup tricks for optimal comfort.
Your post really resonates with me. I’ve also experienced firsthand how crucial proper bias lighting is, especially with high-resolution screens like 12K monitors that demand more from our visual systems. Initially, I underestimated the importance of high-CRI lighting and went for cheaper options, which resulted in dull colors and increased eye fatigue. Once I upgraded to a 98 CRI bias light and calibrated it using a colorimeter, the difference was night and day. Colors appeared more vibrant, and my eyes felt less strained even during longer working sessions. A tip that worked for me was to carefully position the bias lights at a slight angle away from direct view, to minimize glare and reflection. Has anyone experimented with different mounting or positioning strategies that significantly improved their comfort? It’s interesting how small adjustments like this can make a huge impact on overall visual comfort.