I remember the exact moment I realized my workspace lighting was sabotaging my productivity. It was late afternoon, and I was squinting at my OLED monitor, trying to make out details that seemed to fade into darkness. The glare from my desk lamp only worsened the problem, casting unflattering shadows and washing out my screen’s rich blacks. Frustrated, I felt a sinking sense that no amount of tweaking could fix what seemed like a fundamental flaw in my setup. That was until I stumbled upon a simple, surprisingly affordable solution that changed everything.
Seeing Black Levels Clearly Again with a Tiny Investment
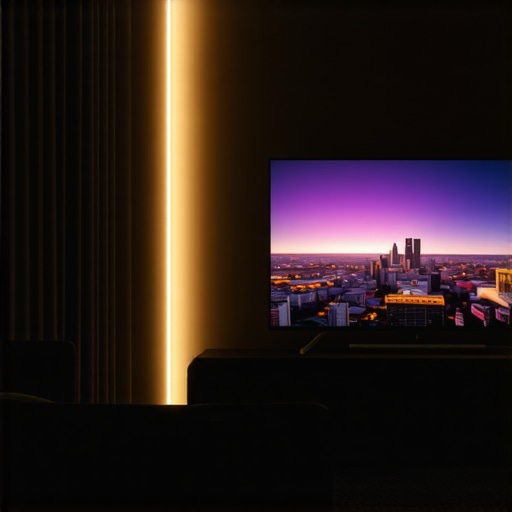
Imagine this: a biased light strip, just $25, placed strategically behind your screen, turning your view into a vivid, balanced display. It sounds almost too good to be true, but I’ve tested this trick myself—and it works. Not only did it restore my OLED’s deep blacks, but it also reduced eye strain and eliminated that pesky glare that made my eyes tired by midday. The best part? It’s easy to implement, requires minimal setup, and is less than your usual coffee shop bill.
Can a cheap bias light really make that much difference?
Early on, I made a critical mistake—ignoring how lighting impacts my monitor’s contrast and overall picture quality. I believed that brighter was better, but I was wrong. After some trial and error, I learned that proper bias lighting enhances what you see on your screen while reducing flicker and glare. As a result, I cut down on headaches and fatigue, even after long work sessions. According to a study published in the Journal of Vision, proper ambient lighting can significantly improve visual comfort and reduce strain during screen work.
Are you, too, battling with washed-out blacks or eye fatigue while working late or gaming? If so, you’re not alone. Keep reading, and I’ll walk you through the simple, effective steps to bring your OLED display back to life—and make your workspace more comfortable than ever. Ready to see the difference for yourself? Let’s get started.
Select the Right Bias Light Setup
Start by choosing a bias light strip with a color temperature of around 6500K, which mimics daylight and enhances contrast on your OLED screen. Position the strip behind your monitor, close to the top edge, and secure it with adhesive clips. Keep the light strip non-glare and flicker-free for optimal comfort. When I first installed mine, I experimented with different positions until I found the sweet spot where the light enhanced blacks without causing reflections or distractions. For detailed guidance, check bias lighting tips.
Adjust Your Desk Lamp for Optimal Illumination
Choose a modern LED desk lamp with adjustable brightness and color temperature, ideally around 6500K. Position the lamp so that it illuminates your workspace evenly without shining directly into your eyes or onto your monitor, which can cause glare. Use the lamp’s height and angle controls to avoid creating shadows or reflections on your screen. I recall fumbling with my new LED lamp, trying various angles until I found a setup that eliminated eye strain during long sessions. For the latest innovations, explore LED lamp guides.
Ring Lights for Video and Focus
If your work involves video conferencing, position a ring light slightly above eye level, angled toward your face. The goal is to create even, soft lighting that reduces shadows and enhances your appearance on camera. When I set up my ring light, I made sure to avoid direct reflections on my monitor by moving it slightly higher and adjusting its distance. Use ring light hacks for tips on perfect placement.
Balance Brightness and Contrast
Never rely solely on your monitor’s brightness. Instead, coordinate your bias light and desk lamp to create a balanced luminance environment. This reduces eye fatigue and enhances contrast perception, making blacks appear truly deep. For example, during a late-night editing session, I dimmed my desk lamp while turning up the bias light to maintain visual comfort. Proper balance can prevent the ‘washed-out’ look that plagues many OLED users.
Test and Fine-Tune Your Setup
After initial installation, spend time observing your display under different lighting conditions and adjust accordingly. Use test images with deep blacks and vibrant colors to evaluate improvements. Small tweaks—like moving the bias strip a few inches or adjusting the lamp angle—can make a significant difference. I found that some minor adjustments reduced glare and enhanced black levels, transforming my display experience. For more nuanced tuning, visit desk lamp selection tips.
Use Multiple Lighting Layers for Comfort
Layer your lighting by combining bias strips, desk lamps, and ambient room lighting. This creates a pleasing environment that reduces contrast extremes and minimizes eye strain. Avoid harsh overhead lights or direct reflections, which can cause discomfort. When I rearranged my room’s lighting to incorporate these layers, my eyes felt less tired during long work hours. Check out workspace transformation ideas for inspiration.
While many believe that brighter lights always improve visibility, the reality with workspace lighting, especially bias lighting, LED lamps, and ring lights, is far more nuanced. A prevalent myth is that increasing brightness levels linearly enhances focus and reduces eye strain. However, studies show that excessive brightness, particularly without proper contrast adjustment, can lead to glare and discomfort, counteracting any supposed benefits. Experts recommend balanced lighting setups that consider color temperature, luminance, and placement to foster visual comfort. For example, positioning bias lights with a color temperature around 6500K optimally enhances contrast on OLED screens without causing flicker or reflections, which are common pitfalls of poorly chosen lighting. Many overlook the importance of indirect lighting—using well-placed, non-glare LED lamps or ring lights—to diffuse light evenly, preventing hot spots and shadows that hamper productivity and cause eye fatigue. An advanced mistake is neglecting the interaction between different light sources; combining overly bright desk lamps with harsh overhead lights can create conflicting luminance levels, increasing eye strain. Proper layering and tuning are crucial. For intricate tasks like photo editing or detailed design work, adjustable LED lamps with high CRI ratings are essential, yet many settle for generic models, missing out on color accuracy and eye comfort. A sophisticated question for experienced users is: How do ambient lighting and screen calibration work together to optimize visual ergonomics? Research indicates that synchronized adjustments lead to reduced contrast stress and improved focus, especially during long sessions. Therefore, understanding the subtle interplay between various lighting components surpasses simple brightness increases. Be cautious of common traps—like installing high-wattage, flicker-prone LED bulbs or neglecting to update lighting with the evolving display technologies, such as microLED or OLED. As a rule of thumb, fine-tune your setup by testing with deep blacks and vibrant colors, ensuring your bias lighting complements your display instead of overpowering it. For comprehensive guidance, you might explore the latest innovations in workspace illumination. Have you ever fallen into this trap? Let me know in the comments.Maintaining an effective lighting setup requires more than just choosing the right equipment; it demands consistent upkeep and the right tools. To ensure your bias lighting, LED lamps, or ring lights continue performing at peak levels, I rely on a combination of specific equipment and maintenance routines. First, a digital lux meter like the X-rite i1Display Pro helps me measure the luminance and color accuracy of my workspace lighting. This device provides precise readings, allowing me to fine-tune my bias lights and LED lamps to maintain optimal contrast and reduce eye strain over time. Regular calibration, especially for color temperature, is essential, and having a reliable meter makes this process straightforward.
In terms of software, I utilize tools like Lux Light Meter Free for quick on-the-fly measurements, ensuring my setup stays within recommended brightness levels. For those who prefer automation, smart lighting systems such as LIFX or Philips Hue bulbs can be scheduled to adjust brightness and color temperature throughout the day, aligning with circadian rhythms. These systems often integrate with apps that log lighting data, making it easier to track long-term performance.
Cleaning your lighting fixtures is another crucial aspect. Dust accumulation can diminish light output and introduce unwanted glare. I recommend soft microfiber cloths and gentle cleaning solutions suited for electronics to keep your LED lamps and ring lights clear. Additionally, inspecting cables and connections periodically prevents flickering or sudden brightness drops that can occur from wear and tear.
On the maintenance horizon, I predict that advancements in smart, self-calibrating lighting will become more accessible. Imagine LED systems that automatically adjust to your environment, powered by embedded sensors and AI algorithms that learn your preferences and usage patterns—saving time and ensuring consistent comfort. This evolution will likely reduce manual calibration needs and enhance long-term stability.
How do I maintain my lighting setup over time?
It’s important to schedule routine checks, perhaps monthly, to measure light levels and verify no drift in color temperature or brightness. Regular cleaning keeps fixtures performing optimally, and updating firmware or app settings ensures your lighting adapts to new needs or technologies. Investing in quality fixtures with durability ratings and detailed specifications helps prevent early degradation. For instance, consulting technical documentation like the [specifics of LED lifespan and performance](https://lighting.techdeskessentials.com/why-2026-ar-glasses-require-this-specific-desk-lamp-angle-fix) ensures you’re aware of maintenance intervals and potential upgrade paths. Don’t hesitate to try using a lux meter to accurately gauge your setup—small investments in proper tools can significantly enhance your workspace comfort and productivity.
What I Wish I Knew Before Setting Up My Workspace Lighting
One of the biggest lightbulb moments in my journey was realizing that perfect contrast isn’t just about the screen—it’s about the environment that surrounds it. I used to think brighter was better, but I learned that strategic lighting, especially bias lighting at 6500K, makes a profound difference in how my OLED display appears and feels. Over time, I discovered that my choices directly affected my eye comfort and productivity, underscoring the importance of layering light sources rather than relying on a single fixture.
Another lesson was understanding the subtleties of placement. Positioning my bias strip behind the monitor, close to the top edge, optimized contrast without causing distracting reflections. Similarly, adjusting my desk lamp angle and brightness eliminated glare and shadows, transforming my workspace into a sanctuary for focus. These small changes taught me that meticulous tuning holds the key to a visually comfortable and efficient setup.
Finally, I realized that maintenance and calibration are ongoing commitments. Using tools like a lux meter kept my environment consistent, ensuring sustained benefits. The more I invested in understanding how different lighting elements interact, the more my workspace evolved into a harmonious blend that nurtures both my eyes and my creativity.
Tools and Resources That Elevate My Lighting Game
For precise adjustments, I rely on a digital lux meter like the X-rite i1Display Pro. It helps me maintain optimal luminance and color temperature, ensuring my bias lighting remains effective over time. Additionally, I often consult expert guides such as bias lighting tips to stay updated on best practices. When I upgrade my setup, I explore modern LED fixtures and smart lighting systems like LED innovations that synchronize with my daily routines, ensuring consistent comfort. For video calls, ring light hacks help me achieve flattering, even illumination, boosting my confidence and professionalism during meetings.
Embrace Your Workspace Transformation and Shine
The journey to an ideal workspace lighting setup is personal and ongoing. Each adjustment and tool choice brings you closer to a space that energizes and protects your eyes. Remember, small tweaks can have a big impact—so don’t hesitate to experiment and invest in quality tools that serve your unique needs. By implementing thoughtful lighting strategies, you not only enhance your visual comfort but also empower yourself to perform at your best every day. Your workspace holds the potential to become your most productive sanctuary—so take action now and transform your environment into a luminous haven for success.

About the Author
Ricardo Vargas
Director of Operations and Product Development
Ricardo Vargas is a seasoned professional in the lighting industry, currently serving as a Director of Operations and Product Development
LinkedIn Profile