Have you ever been mid-stream or on a crucial video call when your trusty ring light suddenly gives up, and your phone mount snaps right off? I can’t count how many times I’ve faced that moment of panic—fumbling in the dark, trying to stabilize my shaky setup, feeling that little wave of frustration creep in. That split second of chaos can totally ruin your workflow or the vibe of your content. But here’s the truth: accidents happen, and with a few simple tricks, you can get back to perfect lighting fast. Today, I want to share my personal experience with fixing those pesky broken phone mounts and show you how I turned a frustrating disaster into an opportunity to improve my entire setup.
Why This Matters More Than You Think
Lighting isn’t just about looking good on camera; it’s about creating a workspace where you feel confident, focused, and professional. When your phone mount snaps, it’s more than just an annoyance—it’s a disruption that throws off your entire shot. Plus, if you’re like me, fixing your gear quickly saves time, money, and your peace of mind. Imagine having the tools and know-how to repair your ring light’s phone holder without waiting days for a replacement or shelling out hundreds for a new unit. That’s exactly what I discovered after a few mishaps early on. And believe me, I learned the hard way that some mistakes can be avoided with a little know-how, especially when it comes to workspace lighting and equipment. If you’re curious about how proper lighting can transform your videos and prevent these frustrating failures, check out [workspace lighting tips](https://lighting.techdeskessentials.com/workspace-lighting-transform-your-office-with-modern-led-solutions).
Is Fixing Your Ring Light Worth the Hassle?
I used to think replacing a broken phone mount was easier than repairing it, but I quickly realized that isn’t always true. My early mistake was assuming I needed to buy a brand-new ring light every time the mount snapped. Turns out, with the right tools and guidance, I could salvage my existing setup and even customize it for better stability. This not only saved me money but also gave me a sense of accomplishment. So, yes—repairing your ring light isn’t just worth it, it’s empowering. Plus, it keeps you in control of your workspace, rather than being forced into costly replacements. If you’ve faced this problem yourself, know that you’re not alone—many content creators and professionals deal with similar issues regularly, and help is just a few steps away.
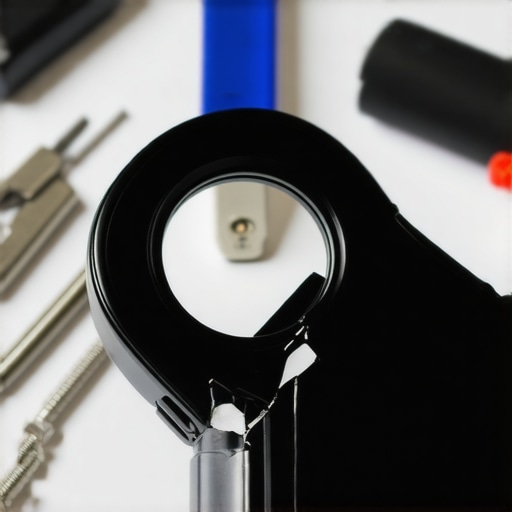
Secure Your Existing Equipment
First, assess your broken phone mount and identify the type of damage—cracks, snapped clips, or loose fittings. Use a pair of pliers to gently remove any broken plastic pieces without damaging the rest of the setup. Find the material around the mount; if it’s plastic, consider applying a strong, clear epoxy adhesive like epoxy glue in small amounts to mend cracks. Clamping the parts together securely for 30 minutes ensures a solid bond. This process is akin to repairing a frayed cable—precision matters, and a little patience saves money from replacements. During my own fix, I used epoxy to reattach a cracked plastic clip, which held firm after curing and saved me from buying a new mount. Always ensure the adhesive is fully cured before reassembling your setup to prevent future failures.When it comes to optimizing your workspace lighting, many believe that brighter is always better or that a single solution fits all. However, these misconceptions can lead to subpar lighting that strains your eyes or hampers productivity. For instance, some assume that increasing luminosity automatically improves focus, but in reality, overly intense lighting can cause glare and fatigue, especially if not well diffused. This is why understanding the nuances of different lighting types—such as bias lighting, ring lights, and desk lamps—is crucial to creating an effective setup.
Are Brightness Levels the Only Thing That Matters in Task Lighting?
The truth is, color temperature and the way light interacts with your environment are just as vital. Cooler temperatures (around 5000K-6500K) are excellent for alertness during work, while warmer tones promote relaxation. A study by the American Medical Association highlights that proper lighting reduces eye strain and enhances focus, but only if the lighting is correctly balanced and suited to your tasks. Relying solely on high lumen outputs without considering these factors can backfire, leading to headaches or decreased productivity. Moreover, many overlook the importance of adjustable lighting solutions that can adapt to different times of day or tasks, making static lighting setups less effective over time.
So, when choosing your LED lamps or desk lighting, prioritize versatility and quality over sheer brightness. For advanced workspace setups, integrating bias lighting can significantly improve monitor contrast and reduce eye fatigue, as discussed in [these bias lighting tips](https://lighting.techdeskessentials.com/bias-lighting-tips-to-enhance-your-home-office-setup). This subtle, indirect lighting creates a more comfortable visual environment, especially during extended work sessions.
Common Mistakes That Derail Your Lighting Goals
One frequent mistake is placing light sources in locations that cause unwanted shadows or reflections, which can be distracting or blinding. For example, direct overhead lights might cast harsh shadows on your work surface. Instead, positioning lights at the right angles—such as side-mounted desk lamps or adjustable LED panels—can improve clarity and reduce glare. Also, many ignore how the color rendering index (CRI) affects the vibrancy and accuracy of colors on your screen or workspace, which is crucial for creative tasks. Choosing high-CRI lighting (above 90) ensures your environment accurately reflects colors, making work more comfortable and reducing eye strain. To get the most out of your lighting investments, consider comprehensive guides like [how to pick the perfect desk lamp](https://lighting.techdeskessentials.com/how-to-choose-the-perfect-desk-lamp-in-2025).
Finally, be cautious of trap lighting setups that look good in photos but are impractical in real life. For instance, overly decorative fixtures or overly bright accent lights can cause discomfort or distract from work tasks. Instead, aim for a balanced combination of task, ambient, and accent lighting tailored to your specific needs. Remember, effective workspace lighting is more about strategic placement and quality rather than just high lumen counts. Have you ever fallen into this trap? Let me know in the comments.Maintaining your workspace lighting setup is crucial to ensure consistent performance and avoid costly replacements down the line. One of my personal favorite tools for long-term maintenance is a digital lux meter—specifically, the Extech LT45 Light Meter. I use it to regularly measure the lumen output of my LED lamps and ring lights, making sure they haven’t dimmed over time due to aging or dust accumulation. This hands-on approach allows me to spot potential issues early before they become noticeable in my video quality or comfort. Regularly cleaning your lamps with a soft microfiber cloth is equally vital; dust and fingerprints can reduce brightness and color accuracy, impacting your workspace’s overall vibe. For adjusting and fine-tuning, I recommend investing in a **Dimmable LED Driver**—this component lets you maintain optimal brightness levels without flickering or buzzing, especially important if you notice fluctuations after long usage periods. In the future, I predict advancements like smart lighting systems integrated with IoT devices will make maintenance even easier, automatically notifying you when it’s time for a bulb change or cleaning. To stay ahead, integrating software that logs your light performance and alerts you to deviations can be a game-changer. A good example is the Philips Hue ecosystem, which seamlessly connects with your mobile device, giving real-time updates and controls.
How do I maintain my workspace lighting over time?
A proactive maintenance routine includes cleaning fixtures monthly, checking connections, and periodically measuring light output. By doing so, you ensure your workspace remains conducive to productivity and eye health. Remember, even high-quality LED lamps and bias lighting can degrade if neglected. If your setup is relatively intricate, consider using a **Luminaire Maintenance Kit** that includes calibration tools and spare parts—these kits are invaluable for DIY enthusiasts who want to prevent issues before they disrupt their workflow. Don’t forget to keep track of your maintenance schedule digitally or with a simple log—this habit ensures you won’t overlook preventive steps. For comprehensive guidance, I recommend reviewing detailed maintenance protocols on trusted lighting technical blogs or consulting with a professional on optimal adjustment techniques. Want to go a step further? Try calibrating your LED lighting to specific color temperatures and brightness levels using a colorimeter app on your smartphone. This small step ensures your workspace always maintains the ideal lighting conditions, adapting seamlessly as your needs evolve. Small, deliberate maintenance routines not only extend the life of your equipment but also preserve the quality of your work environment, making sure your workspace continues to inspire and serve you efficiently.
The Unexpected Lessons That Changed My Lighting Game
One of the hardest lessons I learned was the importance of proactive maintenance. I used to overlook simple routines like dusting my LED lamps or checking connections, only to face sudden flickers or dimming just before critical calls. Now, I know that a little regular attention can prevent major setbacks and extend the life of my gear. Another insight? That high lumen output isn’t everything. Focusing on color temperature and CRI has transformed my workspace from a visually harsh environment to a comfortable, eye-friendly zone. Lastly, I realized that experimenting with placement—like angling my desk and bias lighting—is the secret sauce for eliminating glare and shadows, making my video calls look professionally lit every time. These lessons came from hands-on experience, reminding me that understanding your tools deeply can save money and elevate your content quality in ways generic advice can’t match.
My Essential Toolkit for Workspace Lighting Mastery
To truly optimize my workspace lighting, I rely on a few trusted tools and resources. The bias lighting tips article has been a game-changer in creating an ambient glow that reduces eye strain. For measuring and calibrating my lights, I use the digital lux meter—simple yet effective in ensuring consistent brightness levels. My go-to lamps include the latest luminous LED desk lamps that blend quality with efficiency. When I need guidance on styling my setup, the how to choose the perfect desk lamp guide has saved me from costly mistakes. These resources, combined with a bit of experimentation, have helped me craft a workspace that energizes me every day.
Your Turn to Illuminate and Conquer
Effective workspace lighting isn’t just about brightness; it’s about creating an environment that fuels your focus, reduces fatigue, and boosts your confidence. Whether you’re fixing a broken ring light or tweaking your bias lighting, every small improvement adds up to a more inspiring professional space. Remember, mastery comes through curiosity and experimenting—so don’t hesitate to try new angles, adjust color temperatures, or invest in tools that understand your needs. Your ideal workspace is within reach, and each step you take towards better lighting is a step closer to clearer visuals and greater productivity. Keep shining, and transform your setup into a true reflection of your best work!
What’s the one workspace lighting challenge you’re eager to conquer next? Share your thoughts below—I’d love to hear your story!

About the Author
Ricardo Vargas
Director of Operations and Product Development
Ricardo Vargas is a seasoned professional in the lighting industry, currently serving as a Director of Operations and Product Development
LinkedIn Profile