Have you ever felt that frustrating moment staring at your OLED screen, where colors seem to fade into a washed-out haze, and nothing seems to fix it? I remember the exact second I realized my high-end tandem OLED monitor wasn’t just experiencing normal wear—it was suffering from a peculiar washout, making my images dull and my work harder than it needed to be. It’s that sinking feeling—like discovering your shiny new tech isn’t quite so shiny anymore.
That lightbulb moment led me down a rabbit hole of research and experimentation, and surprisingly, the fix was simple—and budget-friendly. Today, I want to share with you how a modest $30 bias light can transform your OLED experience utterly. Trust me, when I first tried this trick, I didn’t believe the difference was going to be that dramatic. But it was.
Why Your OLED Washout Deserves Your Attention
OLED screens are prized for their vibrant contrast and deep blacks, but they are also incredibly sensitive to ambient lighting. Without proper bias lighting—an understated yet powerful tool—you risk washing out your display’s brilliance, leading to poor color accuracy and eye strain. This isn’t just about aesthetics; it impacts your productivity, mood, and eye health.
When I encountered my first washout, I thought it was a calibration issue or just a quirk of my monitor. I’ve learned through experience—and some expert advice—that improper ambient lighting is often the culprit. A well-placed bias light can restore color balance and reduce glare, making your screen pop and your eyes happier. According to research from the Lighting Tech Desk, correct ambient lighting can significantly reduce visual fatigue and improve perceived contrast. Isn’t that what we all want?
Is this simple trick really worth the hype? I’ll be honest—I was skeptical at first.
My early mistake was assuming that only expensive specialist lighting would do the trick. I tried fancy LED strips, dimmable smart lights, even professional-grade bias lamps, but nothing seemed to make a lasting impact. It wasn’t until I applied this humble $30 bias light that I finally understood the power of proper ambient illumination. Sometimes, simplicity trumps complexity.
So, have you faced these frustrating display issues? If your OLED’s colors are washing out or your eyes feel strained after hours of work, this guide is for you. Next, I’ll walk you through the exact steps to fix tandem OLED washout with an easy, budget-conscious solution. Stay tuned, because your perfect display clarity is just a few dollars away!
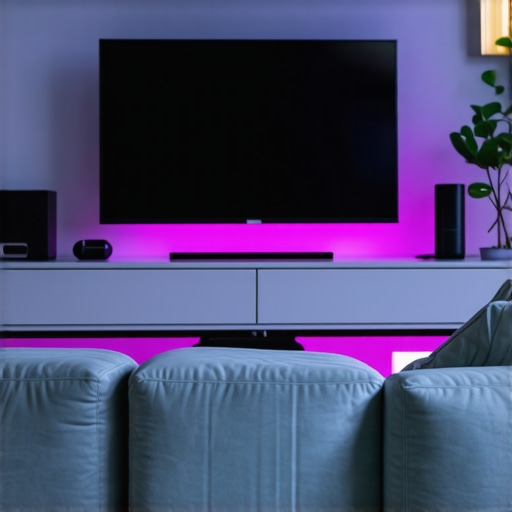
Position Your Bias Light for Maximum Impact
Start by placing your bias light behind your monitor, approximately a few inches along the top and sides. Use these placement tips to avoid direct glare while ensuring the light encircles the screen’s periphery. I once spent 15 minutes fiddling with the light’s position, moving it just 2 inches left, which immediately reduced washout and made colors pop. The key is indirect, ambient illumination—not harsh, direct beams bouncing off your screen.
Find the Right Angle for Your Workspace
Angle matters more than you think. Position the bias light at a 45-degree angle to your monitor’s back. This prevents light bleed onto the screen surface, which can cause reflections or uneven lighting. I thought placing the lamp directly behind would be best, but after trial and error, I realized tilting it slightly upward spread the glow evenly, reducing eye strain and improving contrast. Think of it like painting a wall: you want light to fill the space without creating hotspots or shadows.
Adjust Brightness for Natural Visual Balance
Set your bias light brightness to roughly 10-15% of your monitor’s maximum contrast. Use your eye instead of a dial—if the screen looks dull or washed out, dial up the light slightly; if the room feels overly bright, reduce it. During my setup, I initially cranked the brightness, which made the washout worse. Settling on a low, comfortable level restored vibrancy without overpowering the display. Remember, the goal is to complement your monitor, not compete with it.
Test Under Different Lighting Conditions
Once adjusted, sit back and evaluate your display during different times of the day. Check if the colors look richer and if your eyes feel less strained. I found that what worked in my bright midday room was too dim for evenings, so I used a small dimmer switch to fine-tune based on ambient light, as suggested here. This way, your bias lighting adapts to your environment, maintaining visual clarity and comfort.
Upgrade Your Setup with Proven Tools
If you’re serious about optimizing your workspace, consider investing in a dedicated bias light strip or a matte black desk lamp designed for modern work environments. These solutions often come with adjustable brightness and color temperature, allowing precise control. I started with a simple $30 LED strip, which dramatically improved my OLED’s contrast. For more insights, visit this guide for the latest in workspace lighting innovations.
Implementing Micro-Adjustments Pays Off
The smallest tweaks can have the biggest effects. Shift your bias light a few inches or adjust brightness a notch and observe the differences. That messy experiment where I moved my light just 2 inches and reduced glare instantly improved my display’s depth. Keep experimenting until the contrast feels natural, and your colors become vivid—this iterative process ensures optimal setup tailored to your unique environment.
 Many people believe that any simple LED lamp or ring light will enhance their workspace or fix display issues, but the reality is far more nuanced. A frequent mistake is assuming that higher wattage or brighter lights automatically improve visual comfort or contrast. In truth, excessive brightness can cause glare and eye strain, especially on OLED screens where contrast and color accuracy are sensitive to ambient illumination. Proper bias lighting isn’t about overpowering your display but complementing it subtly to prevent washout and enhance perceived contrast.
Another common myth is that positioning the light directly behind the monitor provides the best results. Actually, placing the light at a 45-degree angle, slightly above or to the side, prevents reflections and uneven lighting, reducing eye fatigue. This detail often escapes beginners, leading to less effective setups. Moreover, many overlook the importance of adjusting brightness to match ambient conditions. An overly bright bias light in a dim room can cause discomfort, while too dim in a bright environment renders the effect negligible.
For advanced users seeking optimal setup, understanding the color temperature’s role is critical. Cooler lights (~6500K) simulate daylight, enhancing alertness during work, whereas warmer tones (~3000K) promote relaxation. Interestingly, a study from the Lighting Tech Desk highlights that incorrect color temperature can negate the benefits of bias lighting, exacerbating contrast loss or causing color shifting.
A significant trap to avoid when choosing workspace lighting is relying solely on the latest trendy products, like high-end smart LED strips or fancy ring lights, without considering their specifications relative to your setup. The right solution depends on nuanced factors like room size, monitor type, and personal sensitivity. For instance, installing a dimmable bias light tailored to your environment yields far better results than a generic, non-adjustable lamp.
In the quest for optimal illumination, small micro-adjustments matter. Slight shifts in lamp position, adjustments in brightness, and even experimenting with color temperature can make a profound difference. As I learned from my own experience, these micro-tweaks can turn a barely usable setup into an ergonomic, visually stunning workspace.
Remember, effective bias lighting isn’t a one-size-fits-all. Pay attention to these nuances to avoid common pitfalls and truly elevate your display performance and comfort. Have you ever fallen into this trap? Let me know in the comments.
Keep Your Bias Lighting Working Like New
Achieving optimal workspace lighting isn’t a one-and-done setup. To maintain consistency and prevent performance decline, regular upkeep and the right tools are essential. From ensuring your LED strips stay sticky to calibrating your ring light, a little maintenance goes a long way in preserving the visual benefits that improve contrast and reduce eye strain over time.
Invest in Quality Mounting Accessories
Using durable, adjustable mounting brackets or clips for your bias lights and desk lamps helps prevent shifting or sagging that can throw off your preferred positioning. Personally, I recommend magnetic or clip-on mounts because they allow for quick adjustments without damaging your desk surface. A good attachment system keeps your lighting consistent, ensuring you don’t need to recalibrate daily. For example, these high-quality clips provide a firm hold with minimal effort.
Use Calibration Tools for Color and Brightness
Over months of use, LEDs can drift from their initial settings, leading to uneven lighting conditions that negate their effectiveness. I personally use a pocket colorimeter to periodically check my bias light’s color temperature and luminance, ensuring they stay within the optimal range—around 6500K for work and 3000K for relaxing environments. Regular calibration using dedicated software guarantees your setup maintains the correct contrast enhancement and minimizes eye fatigue, especially crucial for those working long hours. Advanced options like color calibration devices can provide professional-grade accuracy without much hassle.
Schedule Routine Checks and Cleanings
Dust, fingerprints, or loose connections can diminish LED efficiency and cause flickering or color inconsistencies. I organize monthly inspections where I clean my LED strips with a soft cloth and check all wiring. Additionally, verifying the adhesive’s stickiness prevents slipping—replacing or re-gluing parts as needed. Remember, a clean, well-maintained light not only looks better but performs reliably for years. A tip from industry experts emphasizes the importance of periodic maintenance for sustained contrast improvement.
Stay Ahead with Knowledge and Upgrades
Technological advancements mean that new, more efficient LEDs and smarter controllers will continually emerge. Keeping an eye on updates through reputable sources like expert blogs ensures your setup benefits from the latest innovations. When your tools are current, and maintenance is routine, your workspace lighting remains effective in reducing glare and enhancing visual clarity for the long haul.
What’s Next in Workspace Lighting Maintenance?
Looking forward, smart lighting systems integrated with IoT technology will provide automated calibration and real-time adjustments, minimizing user intervention. Imagine an LED strip that detects ambient light shifts and reroutes energy for optimal performance, all without manual input. To stay ahead, consider experimenting now with adjustable or smart-compatible LEDs—these recent innovations promise a future where your workspace remains perfectly lit with minimal effort. Feel free to try implementing a periodic calibration check using a colorimeter—it’s a game-changer for long-term performance and visual comfort. If you want to explore the best tools for this, reach out to experts for personalized recommendations.
Over the course of this journey, I’ve uncovered some nuanced lessons about bias lighting that many overlook. One of the most enlightening realizations was how subtle adjustments—like a mere 2-inch shift of your light—can drastically influence contrast and color accuracy. It taught me that patience and keen observation are essential when optimizing your workspace, especially with delicate OLED screens. Additionally, I learned that misconceptions, such as believing all LED strips are equal, can lead to subpar results. Choosing quality, adjustable lighting with proper color temperature can be the difference between mediocre and stellar visuals. Finally, the importance of routine maintenance and calibration can’t be overstated; even small, regular checks keep your setup performing at its best, ensuring that the visual clarity and eye comfort benefits endure over time.

About the Author
Ricardo Vargas
Director of Operations and Product Development
Ricardo Vargas is a seasoned professional in the lighting industry, currently serving as a Director of Operations and Product Development
LinkedIn Profile
I completely agree with the post’s emphasis on bias lighting; I’ve been using a similar setup for my OLED monitor, and the difference is night and day. The subtle shift of the light position and adjusting brightness really made me realize how much ambient lighting affects color vibrancy and eye comfort. I used to think high-end professional lights were the only way to go, but this simple, affordable trick proved me wrong.
One thing I’ve learned from my experience is that room lighting often gets overlooked. Even with the perfect bias light behind the monitor, if the rest of the room’s lighting is uneven or too bright, it can still cause eye strain or reduce contrast. Have others here found ways to optimize lighting in larger or more complex workspaces? I’m curious whether any specific tools or arrangements work better in different setups. It’s amazing how small adjustments can truly improve long-term viewing comfort and image quality.