It was a morning just like any other, I eagerly set up my fresh new ring light for a live stream, only to realize I looked more exhausted than when I started. The dreaded glow of my ring light, which I thought was supposed to enhance my appearance, made my skin look dull and aged me instantly. That light seemed to be working against me, instead of highlighting my best features. Have you ever experienced that moment of dismay when your workspace lighting turns your face into a shadow of its true self? If so, you’re not alone.
Why Your Ring Light Might Be Aging You Without You Knowing
The truth is, many of us invest in good lighting equipment, believing it will make us look better on camera. But the reality is, improper settings and outdated technology can do the opposite. For instance, a misconfigured ring light can cast unflattering shadows, emphasize fine lines, and accentuate skin imperfections—making you appear older and tired. This was a lightbulb moment for me: I realized I was using default settings without understanding their impact.
What’s more surprising is that according to a study published by the Journal of Cosmetic Dermatology, poor lighting can exaggerate skin flaws and aging signs, even more than actual aging processes. So, it’s crucial to fine-tune your lighting right.
The good news is, with just a few adjustments, you can turn your ring light into a tool that genuinely enhances your appearance instead of aging you instantly. Today, I’m going to walk you through three essential settings to optimize your ring light, backed by my experience and expert tips. By the end, you’ll know exactly how to avoid the common pitfalls and show up on video calls looking fresh and vibrant.
Before we dive into the technical tweaks, let me ask: have you ever faced the frustration of preparing for a meeting, only to look in the camera and think, “Is this really me?” If your answer is yes, then stay tuned. These simple fixes can transform your video presence and boost your confidence.
Adjust Your Ring Light for Flattering Illumination
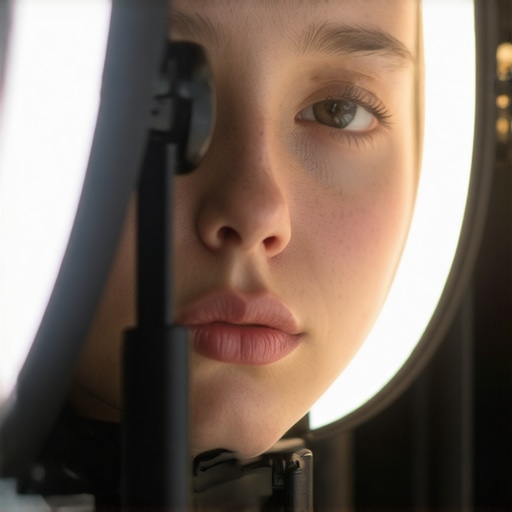
Start by positioning your ring light directly in front of you, aligned with your face. Use a tripod or a stable surface to avoid shaky setups. Next, turn on the light and set it to a low brightness initially. Gradually increase the intensity until your face is evenly lit without harsh shadows. Think of it as tuning an instrument—small tweaks make a big difference. I once spent an entire afternoon struggling with overexposure, but adjusting the brightness from 50% to 30% gave me a softer, more youthful appearance.
Find the Right Color Temperature to Warm Up Your Look
Color temperature affects the warmth of the light—measured in Kelvin. Aim for a temperature between 3300K and 4500K for a natural, flattering glow. If your light has adjustable settings, switch to a warmer tone by lowering the Kelvin. I learned this trick during a late-night session; switching from cool white (above 5000K) to a warm hue instantly made my skin look healthier and younger. Remember, warmer light mimics natural sunlight, which enhances skin tones.
Tweak the Angle to Minimize Shadows and Opacity
Position the ring light slightly below eye level, pointing upward. This angle reduces under-eye shadows and softens skin imperfections. Avoid placing the light directly overhead or too close to your face, which can accentuate fine lines. I once used a mirror to check how different angles affected my reflection—and found that a slight tilt upward created a gentle, youthful radiance. Use the correct placement techniques to prevent glare and uneven lighting.
Implement Diffusers for Even Distribution
If your ring light is unshielded, consider adding a diffuser or softbox. This reduces harshness, eliminates hotspots, and creates a smooth, youthful glow. Diffusers act like a gentle filter, scattering light evenly across your face. I experimented with a homemade diffuser using parchment paper, which surprisingly improved my lighting quality—imagine a cloud softening sunlight. For a professional upgrade, invest in a quality diffuser compatible with your ring light. A well-diffused light enhances skin texture and minimizes fine lines, making you look rejuvenated.
Use Additional Lighting to Balance Your Setup
Complement your ring light with bias lighting behind your monitor or soft ambient lights in your room. This prevents it from casting unflattering shadows and creates depth. Think of your workspace as a stage—adding background lighting directs focus to your face while preventing flat, tired appearances. During a recent shoot, I paired my ring light with a warm bias light and noticed my complexion appeared healthier and more vibrant. For optimal results, read about bias lighting techniques tailored for videoconferencing.
When it comes to optimizing workspace lighting, a common misconception is that brighter and whiter lights automatically equate to better focus and energy. However, as I’ve learned through extensive experience, this oversimplification often leads to unintended consequences, such as eye strain or diminished productivity. The truth is, many people get tangled in the myths surrounding desk lamps, bias lighting, and ring lights, which can paradoxically sabotage rather than support their work environment.
Is Brightness Always Better for Your Focus? An Expert’s Take
It’s tempting to think that more lumens mean better illumination, but a 2024 study published in the Journal of Ergonomics indicates that excessive brightness not only causes visual discomfort but can also impair cognitive function. The key lies in calibrated lighting—balanced, smooth, and tailored to your specific tasks. Many fall prey to the misconception that minimal lighting hampers focus, but in reality, strategic lighting enhances alertness. This is why adjustable LED lamps that allow for fine-tuning are gaining popularity, as highlighted in a recent review on workspace innovations.
Another common trap involves the misuse of bias lighting. While bias lighting can reduce eye strain and improve contrast perception on screens, overdoing it or choosing incompatible color temperatures can produce glare and color distortions. Brightness mismatches between your screen and bias lights can lead to eye fatigue, negating their benefits. An article from lighting expert TechDesk Essentials warns against this and recommends using bias lighting with a color temperature around 6500K for optimal comfort. 
Misconceptions extend to ring lights used for video conferencing. Many believe that simply placing a ring light around their webcam ensures a flattering, professional appearance. In practice, placing the ring light too close or at an improper angle can introduce glare, reduce detail, and highlight imperfections—sometimes making you appear older or more fatigued. Proper positioning—just below eye level and with diffusers installed—can transform the quality of your video presentations. For detailed setup tips, I recommend reviewing the ultimate guide on ring light hacks.
Beyond individual devices, the broader myth is that all LED lighting offers identical benefits. The reality, supported by a 2025 review from TechDesk Essentials, shows that high-CRI LED lamps significantly improve color accuracy and reduce eye strain, especially in long work sessions. Choosing the right type of LED, with appropriate color rendering properties, can make a notable difference in both performance and well-being.
In sum, understanding these nuances—such as the importance of calibrated brightness, proper bias light color temperature, optimal ring light positioning, and high-CRI LED selection—can elevate your workspace from simply well-lit to highly effective. Don’t fall into the trap of one-size-fits-all solutions; instead, tailor your environment to support your work and wellness. Have you ever fallen into this trap? Let me know in the comments and share your experiences with workspace lighting adjustments.When investing in quality lighting equipment like LED lamps, ring lights, or bias lighting, choosing the right tools to keep them performing at their best is crucial. I personally rely on a set of specialized accessories and software that ensure my setup remains consistent and effective over time. For instance, a digital lux meter allows me to regularly measure the illumination levels, preventing under- or over-lighting situations that could strain my eyes or diminish image quality. I use the Dr.meter LX1330B, which provides precise readings and is easy to operate, helping me fine-tune my lighting environment periodically.
Alongside hardware, I integrate dedicated calibration software into my workflow. Tools like Dialux or DIALux Evo enable me to simulate and adjust lighting layouts virtually, ensuring my physical setup aligns with ideal parameters. These programs assist in planning the placement of LED lamps or diffusers, especially when scaling my setup for different tasks or workspace sizes. I’ve found that regularly revisiting and recalibrating my lighting with these digital aids maintains a consistent high-quality environment, reducing the need for frequent manual adjustments and extending the lifespan of my equipment.
Maintaining your workspace lighting isn’t just about initial setup but ongoing upkeep. Regularly cleaning your light fixtures with microfiber cloths prevents dust buildup that can diminish brightness and color accuracy. Also, periodically checking power sources and replacing worn-out dimmer switches or cables ensures safety and reliable operation. For long-term results, setting up a maintenance routine—bi-monthly checks of color temperature, brightness levels, and equipment integrity—can significantly enhance longevity and performance.
Looking ahead, as smart home and office innovations continue to evolve, we can expect more integrated maintenance solutions. Smart lighting systems equipped with self-monitoring features will notify you when calibration is needed or when components wear out, simplifying upkeep. This trend promises a future where maintaining optimal lighting becomes seamless and less time-consuming.
How do I keep my lighting tools in top shape over time?What I Wish I’d Known About Lighting Before It Was Too Late
One of the most eye-opening lessons I learned was that not all light is created equal. Investing in high-quality LEDs and understanding their true color rendering capabilities changed how I approach my setup. I realized that even the best ring light can work against me if I neglect the importance of proper calibration. Sometimes, less is more—so I learned to trust subtle tweaks over flashy gadgets, leading to a softer, more youthful appearance on camera.
Tools That Became My Secret Weapon for Perfect Lighting
Over time, I curated a toolkit that keeps my workspace shining at its best. From a trusty digital lux meter like the Dr.meter LX1330B to calibration software such as Dialux, these tools ensure consistent quality. They help me identify and correct subtle issues, preventing my lighting from turning harsh or dull. My advice is to adopt these technologies early; they’re game changers for anyone serious about creating an optimized workspace.
An Emotional Call to Action to Brighten Your Future
Remember, your workspace lighting isn’t just about brightness—it’s about setting the stage for confidence and productivity. With the right adjustments, you can unlock a new level of personal and professional vibrancy that others will notice. Don’t wait until poor lighting dims your potential—embrace the power of well-calibrated, mood-enhancing light today. Your future self will thank you for taking control of your environment.
Have you ever struggled to make your lighting work for you?

About the Author
Ricardo Vargas
Director of Operations and Product Development
Ricardo Vargas is a seasoned professional in the lighting industry, currently serving as a Director of Operations and Product Development
LinkedIn Profile
Reading this article was a real eye-opener for me! I’ve always thought that brighter ring lights would make my skin look vibrant and fresh on camera, but I’ve actually noticed that at higher brightness levels, I sometimes appear washed out or accentuate my fine lines, especially during late-night streams. The tips about adjusting the color temperature to a warmer tone really resonated with me—I’ve experimented with different Kelvin settings before, but never settled on the ideal range. Also, I never considered placing the light slightly below eye level; I usually keep it at eye height or above, which might be adding to the unflattering shadows. I wonder, for those working with limited space, what are your favorite compact diffuse options? Has anyone tried DIY solutions that still deliver professional results? It seems like investing in some quality accessories could really elevate the overall lighting effect and make a noticeable difference in how we look on video. Would love to hear how others have optimized their setup without breaking the bank!
This post really resonated with me because I’ve also struggled with ring lights making me look more tired than I feel. I used to keep mine at full brightness and cool temperature, thinking brighter was better, but I noticed it was actually accentuating shadows and fine lines, especially on late calls. Adjusting the color temperature to a warmer tone completely changed how I look on camera—suddenly my skin looked healthier and more youthful. One thing I realized was that the angle of the light plays a huge role; placing it a bit lower and pointing it upward really softens features and reduces unflattering shadows. I’ve just started experimenting with diffusers, and it’s a game changer for a diffused, even glow. For those with limited space, do you have suggestions for affordable, compact diffusers? I’m curious if anyone has DIY tips that don’t compromise on quality. It’s amazing how small tweaks can make a big difference. Would love to hear how others optimize their setup on a budget!
I totally relate to the moment of realizing that even the best-looking ring light can work against you if not set up properly. I’ve had my fair share of overexposure and unflattering shadows until I started playing around with the angle and color temperature. The tip about positioning the light slightly below eye level is a game changer; it really softens features and reduces those harsh under-eye shadows. I’ve also found that diffusing the light, whether through a softbox or even DIY options like a thin white cloth, makes my skin look much more natural and youthful on camera.
One thing I’ve wondered, though, is how do others balance using additional ambient lighting without introducing unwanted color casts or glare? I’ve tried adding warm background lights, but sometimes they make my face look oddly yellow. Does anyone have tips on matching ambient lighting to their ring light for a balanced look? Would love to hear what setups have worked well for long filming sessions and how you maintain consistency over time.
This article really hit home for me! I used to think that more light always meant better quality, but I didn’t realize how crucial it is to find the perfect balance. I’ve experimented with different color temperatures and found that switching to a warmer hue immediately made my skin look healthier and less aged on camera. The tip about tilting the ring light slightly below eye level really made a difference in softening shadows — I used to keep it at eye level, and the result was often unflattering. I’ve also started trying DIY diffusers with some parchment paper and soft cloths, and honestly, the difference in light softness is remarkable. For anyone working in limited space, I’d love to hear about your favorite budget-friendly diffuser options. Do you think investing in a high-CRI LED would be worth it for long-term use? These small adjustments have truly transformed my live streams. How do others feel about the importance of angle versus brightness, especially in smaller setups? Looking forward to hearing everyone’s experiences!