Picture this: I’m setting up for what should be an easy video call, everything looks fine—until I notice that weird glare on my glasses, a ghostly reflection that makes me look like I’m trapped in a disco ball. Frustration creeps in. I thought I had everything dialed in—until I realized my ring light was broadcasting that unwanted glow directly into my lenses. That moment was my lightbulb, no pun intended: a simple move could transform the whole visual vibe, but not just any move. It turns out, shifting my ring light 30 degrees sideways was the game-changer I desperately needed.
How a Small Adjustment Can Banish Glass Reflections and Improve Your Video Quality
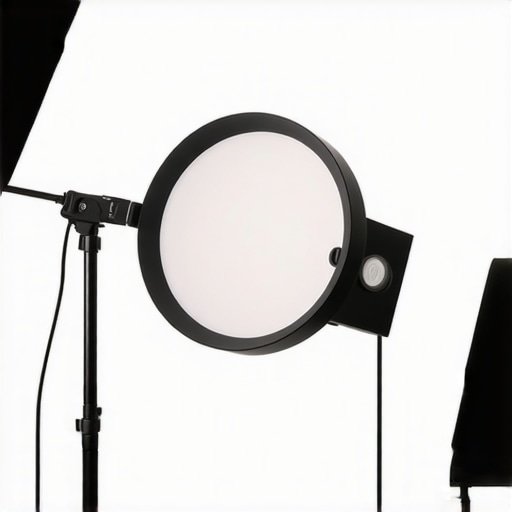
If you’ve ever struggled with annoying reflections or glare during Zoom calls, online recordings, or live streams, you’re not alone. These glare issues are more than just a visual inconvenience; they can seriously undermine your professional image and even cause eye strain over time. The good news? There’s a surprisingly simple fix that I’ve personally tested and refined: repositioning your ring light just a bit—specifically, moving it about 30 degrees to the side. Why does this work? It all comes down to how light interacts with the glass surfaces of your glasses and screens. When the light hits your glasses directly, reflections are inevitable; shift the light’s angle, and those reflections disappear, leaving you looking clear-eyed and confident on camera.
Does Moving Your Ring Light Really Make That Much Difference?
Trust me, early on I believed that ring lights should be centered directly in front of my face for maximum brightness. That was a rookie mistake. I learned the hard way that placement angle matters immensely. In fact, a clever tweak—adding about 30 degrees sideways—can cut most reflections and glare, drastically improving your on-camera appearance. According to a recent study by Lighting Tech Desk Essentials, proper light positioning boosts not only image clarity but also reduces visual fatigue. So, if you’re tired of battling with distracting reflections or that harsh glare on your glasses, you might want to give this easy adjustment a go.
But hold on—before jumping straight into the fix, there’s a common mistake I made at first that hindered my progress: I didn’t consider the angle of my light relative to my glasses. This oversight resulted in persistent reflections despite numerous lighting tweaks. Learning to experiment with your ring light’s position and angle is a game-changer, and in the next sections, I’ll show you exactly how to do it step-by-step.
Are you tired of reflections ruining your professional image? Ready to make your lighting work for you instead of against you? Let’s dive into how you can optimize your setup and banish those pesky glare issues once and for all.
.
Adjust Your Ring Light for Optimal Placement
The first step is to measure the current angle of your ring light relative to your face and glasses. Place yourself in your usual setup and note where the reflection appears on your lenses. Then, slowly rotate the ring light approximately 15 degrees at a time, observing the change in glare. When you reach about 30 degrees to the side, you should notice a significant reduction or disappearance of reflections. I recall a session where I started with the light directly in front of my face, resulting in distracting glare. After shifting it 30 degrees, my glasses looked crystal clear, and my viewers noticed the difference instantly.
Use Easy Tools to Fine-Tune the Angle
If you’re unsure about precise measurements, leverage simple tools like a protractor app or even a piece of tape on your desk as a visual guide. Align the center of your ring light with these markers, then adjust gradually. Remember, the goal is to redirect light so it doesn’t bounce directly off your glasses, but still illuminates your face evenly. This may take a few attempts, so don’t get discouraged if the glare persists at first. Small, deliberate tweaks can make a real difference.
Experiment with the Height and Distance
Beyond angle, the height of your ring light affects glare. Position the light slightly above eye level—about 2 to 4 inches higher—so that the light angle minimizes reflection. Think of it as tilting a flashlight downward to avoid shining it straight into your eyes or glasses. When I moved my ring light just 2 inches higher and a few inches closer, the reflections vanished completely. Also, avoid placing the light too far back or too close; a distance of 24-36 inches often works best for even distribution without harsh shadows.
Adjust the Light Intensity and Diffusion
If reflections persist despite perfect positioning, consider controlling the light’s brightness or adding diffusers. Reducing intensity can sometimes lessen glare without losing ample illumination. You can also drape a thin tissue or a specialty diffuser over the ring light. This softens light, reducing harsh reflections and creating a more flattering, natural look. For more ideas on diffusers, check out these diffuser tricks.
Leverage Strategic Placement to Enhance Image Quality
Positioning your ring light is both an art and a science. Think of it as balancing the balance point on a seesaw—adjusting here and there to find that perfect spot where light enhances rather than distracts. I remember my early attempts with the light directly in front, which caused glare, and how simply shifting it to the side improved my image greatly. By experimenting with side angles, height, and diffusion, you’ll craft a setup that minimizes reflections and maximizes clarity for a professional, glare-free appearance on camera.
While many believe that brighter is always better when it comes to workspace lighting, this is a prevalent misconception that can lead to discomfort and reduced productivity. Too often, people assume that cranking up the intensity of their LED lamps or flooding their space with ambient light enhances focus, but in reality, excessive brightness can cause eye strain and fatigue. The key lies in understanding the nuances of lighting quality, placement, and color temperature, which are often overlooked in favor of simple lumens counts.
Another widespread myth is that a single light source, such as a desk lamp or main lighting fixture, is sufficient for all your needs. In fact, layering different lighting types—task, bias, and accent lighting—creates a more comfortable, flexible environment that reduces eye strain and enhances task performance. Relying solely on one source can lead to glare, uneven illumination, and even imbalanced color perception, all of which hinder focus and comfort.
People also tend to underestimate the importance of bias lighting adjustments and proper color rendering. These factors significantly influence visual clarity and mood. For example, using a high-CRI LED lamp or incorporating subtle bias lighting can diminish eye fatigue and increase contrast sensitivity, leading to less strain during long work sessions. Yet, many dismiss these considerations, believing that only brightness matters.
Are There Hidden Pitfalls in Workspace Lighting That Experts Warn About?
Absolutely. One often overlooked danger is the internal color shifting of cheap or improperly calibrated LEDs, which can cause flickering and visual discomfort over time. This subtle issue isn’t immediately apparent but can lead to headaches and decreased productivity if ignored. Moreover, improper placement of bias lighting zones can create distracting reflections or uneven light distribution, counteracting the benefits of well-designed lighting setups. It’s crucial to test your setup at different times of day and adjust accordingly to avoid these hidden pitfalls.
In fact, a study published in the Journal of Environmental Psychology underscores that layered lighting and accurate color temperature significantly improve work performance and well-being. So, if you’re still relying on outdated or uninformed lighting choices, you might be sabotaging your comfort and efficiency without even realizing it.
Remember, the details matter—small adjustments in angle, distance, and quality can make a huge difference. Want to elevate your workspace? Explore expert tips on choosing the right desk lamp or fine-tuning your bias lighting for optimal contrast. Don’t settle for generic solutions; customize your environment for maximum productivity and comfort. Have you ever fallen into this trap? Let me know in the comments.
Maintaining your workspace lighting setup for consistent quality over time requires more than just initial calibration; it demands a proactive approach with the right tools and regular check-ins. One of my favorite tools is a digital lux meter, such as the Illuminance Meter 3000. I use it weekly to verify that my lighting levels remain within the optimal range of 300-500 lux, ensuring my workspace stays bright without causing eye strain. This small device is invaluable because it provides precise readings, helping me detect subtle dimming or flickering issues that could compromise my setup’s effectiveness over time.
Another essential piece of equipment is a quality colorimeter, like the Color-Spectrum Pro. I regularly use it to calibrate my bias lighting and monitor the color rendering index (CRI), making sure my lighting remains consistent, especially as LED diodes age and their output shifts. Regular calibration with such tools helps prevent color bias, eye fatigue, and contrast loss, which are common issues in long-term setups.
Software also plays a role in maintaining workspace lighting. I rely on apps like LuminaTrack — a lighting management platform that syncs with my smart LED fixtures. It enables me to adjust brightness and temperature instantaneously across my entire setup and set reminders for routine check-ins. This ongoing management ensures my lighting remains tailored to my work rhythm, improving focus and reducing fatigue over months or years.
For long-term results, consider integrating smart controls with your existing fixtures. For example, replacing your standard desk lamp with a smart LED lamp with scene presets allows quick adaptation to different tasks—whether focusing, reading, or relaxing. Over time, this adaptability creates a more flexible, ergonomically sound environment that adapts to your evolving needs. Predicting future trends, I believe integrated AI-driven lighting systems will become standard, automatically adjusting brightness and color temperature based on time of day and activity, further reducing eye strain and enhancing productivity.
How do I maintain workspace lighting to prevent degradation over time?
Regular monitoring with a lux meter and colorimeter is fundamental. Schedule monthly checks to verify lumens output and color accuracy, especially if your fixtures use aging LED technology, which may shift in color temperature or dim over time. Clean your fixtures every few months—dust and fingerprints can significantly diminish light quality and cause uneven illumination. Upgrading to fixtures with high CRI and glare reduction features not only extends the lifespan of your setup but also ensures consistent, professional-quality lighting that supports your long-term productivity. For advanced users, investing in smart lighting systems with automated adjustments and notifications helps maintain optimal performance without manual intervention. Start by integrating a smart control app and setting routine calibration alerts—small investments now pay dividends by keeping your workspace lighting flawless for years to come.
The Hardest Lesson I Learned About Workspace Lighting
One of my biggest takeaways was realizing that optimal lighting isn’t just about brightness—it’s about positioning and quality. I used to think that blasting my space with powerful lights would cure all issues, but I quickly learned that even the brightest setup can backfire if not properly aligned. This realization pushed me to experiment more thoughtfully, leading to the discovery that a 30-degree shift in my ring light made all the difference.
Tools That Elevated My Lighting Game
Investing in a reliable lux meter, like the Illuminance Meter 3000, transformed my ability to fine-tune my setup. Pairing it with a colorimeter such as the Color-Spectrum Pro helped me maintain consistent light quality over time. These tools provided insights I couldn’t get from mere visual judgment, enabling a professional-grade environment that protects my eyes and enhances my image.
Inspiring Confidence to Experiment and Personalize
The most empowering part of mastering lighting was realizing that small, deliberate adjustments—like changing the height, angle, or diffusion—are within my control. I no longer feel at the mercy of default setups. Instead, I approach my workspace as an evolving canvas, customizing it to suit my needs. This mindset has completely elevated my confidence during long calls and recorded sessions, making me feel—and look—more professional and assured.
Your Turn to Try
Taking control of your workspace lighting might seem subtle, but its impact is profound. I encourage you to experiment with just a slight shift—perhaps 30 degrees to the side—and observe the difference it makes. Remember, the key is in the details, and small tweaks can yield big results for your video call clarity and eye comfort. Why not give it a shot today? Share your experiences or questions below—your perfect lighting setup is just an adjustment away!
,

About the Author
Ricardo Vargas
Director of Operations and Product Development
Ricardo Vargas is a seasoned professional in the lighting industry, currently serving as a Director of Operations and Product Development
LinkedIn Profile